BEST POSES FOR PHOTOS – Top 10 photo poses
Do you want to learn how to pose for photos? Or are you in need of some inspiration on how to pose for pictures? In this blog with our top 10 best poses for photos, we hope to inspire you with some photography poses and photoshoot ideas. Our posing tips will be mainly focused on outdoor photography and indoor photography ideas. For our travel blog and business LuxuryResortVideo, we often shoot photos with ourselves as models.
Through experience, we learned several indoor- and outdoor photography poses which we like to share with you. Probably you already experienced it’s quite challenging to figure out how to pose in pictures. Not only it’s hard for a model to be creative in poses for pictures. Also for a photographer, it can be difficult to instruct your model in the right postures for pictures. Supported by many pictures of poses from us we will provide you an overview of our top 10 best poses for a photo!
Outdoor poses for photos
Photo pose 1: Jump in the air
First of all, please be careful when performing this pose for pictures. Especially if you perform it at a risky location but also for injuries because of the challenging movement. It is one of our favorite outdoor photoshoot poses and often we choose this when we are high up in the mountains above the clouds. For us, this photo pose expresses freedom and joy. It looks incredible when you manage the camera framing in such a way the model jumps with clouds underneath him or her, like our photo examples. This will emphasize even more the height you are at.
Model tip: look for a surface where you can jump and land safely. Be aware of loose surfaces and wear grippy shoes. Pull your knees up during the jump to create even more distance to the ground, to make the jump look higher. Swing your arms up for more jumping momentum. This also expresses freedom in this photo pose. Take a deep breath and jump as high as you can when the model poses for photos like this.
Tip for the photographer: To capture this photo pose crispy sharp and at the right moment it’s necessary to use the right shooting mode and shutter speed. Shooting in burst mode it will make your life much easier to capture the right moment instead of timing this in single photo mode. You want to pick the moment where your model is at the highest point of the jump and her posture is controlled. The minimum shutter speed you want to use is double the focal length of the lens you are using. This way you can freeze the moment without any blur in the movement. So for example, if you shoot at 50mm use a minimum shutter speed of 1/100th. To be on the safe side, even a higher shutter speed than double is recommended for these poses for photos.

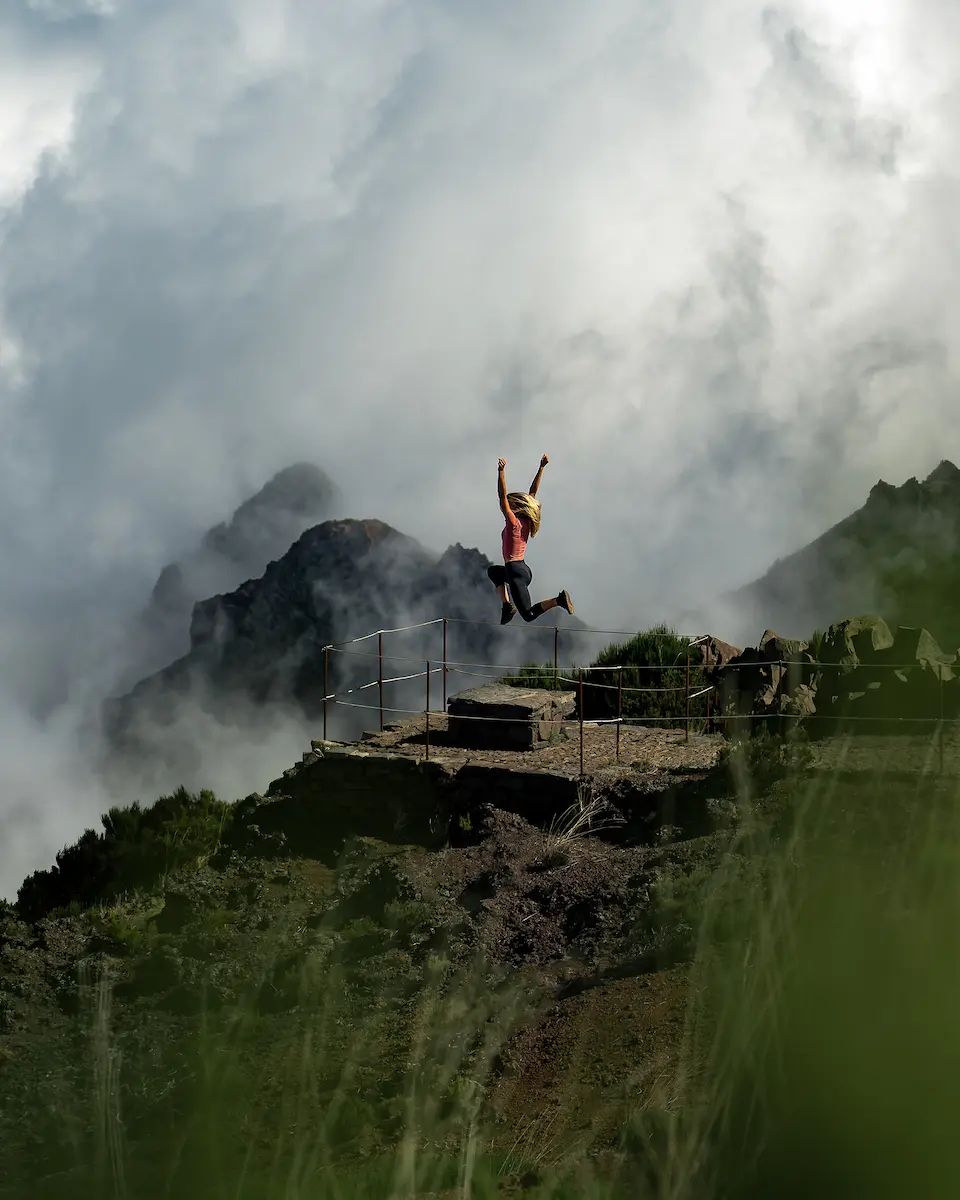
Photo pose 2: Amazed by nature pose
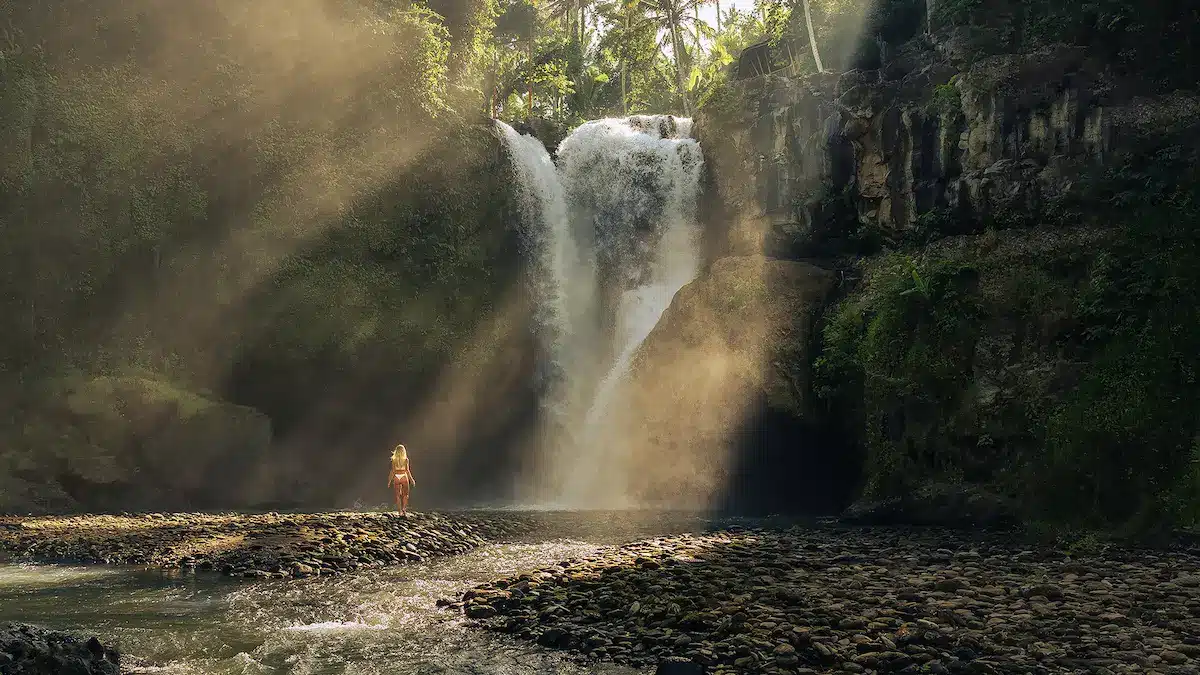
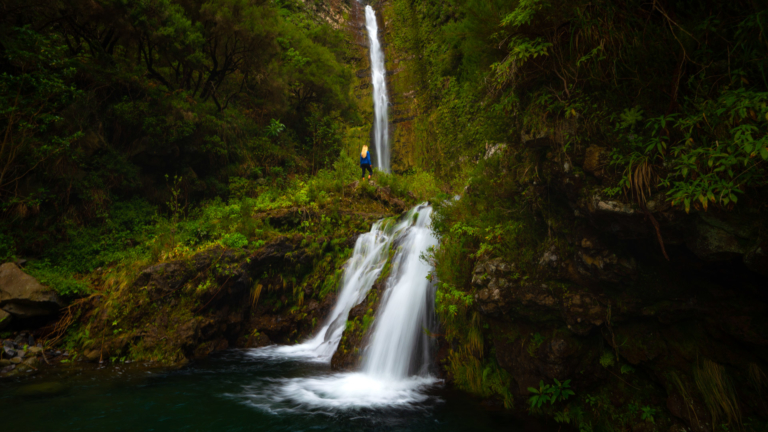
Nature is all around us and still amazes us every day. The most obvious photo pose for us in nature is positioning ourselves in the middle of the frame and looking at the beautiful scenery around us. This is the feeling you get from nature, staring at all the wonders mother earth created. This photo pose works best when you are surrounded by beautiful high trees or when you are in front of a beautiful waterfall.
You can express this pose in several ways. One way is just to stand still with your legs together and your arms along your body with spread hands as if you are frozen by seeing all the beauty around you. Make sure to look at the subject to emphasize the connection with it. Another way is to pose if you are reaching out to the natural subject, like a magically shaped tree or impressive waterfall. We also love to pose as if we are daydreaming in the middle of the moment. You can position yourself sitting on a rock for example, looking attentively with your hand supporting your chin.


Model tip: Be in the moment and stare at all the beauty around you. If your face is visible, express it as if you feel amazed by the surroundings. If you think it looks good, you can even open your mouth a bit. When the model poses for photos like this, it should be the easiest part in case you are at a magical place. In the standing position, you can adjust this a bit by bending one leg slightly and spreading your arms a bit as if you receive all the magic of the beautiful nature around you.
Tip for the photographer: No matter what focal length you use for this shot, always make sure you position your model towards the middle of the frame. This way the photo expresses the feeling as if you are surrounded by nature. Also, try to make sure the connection of the model with nature is visible. So concentrate on the position of the model’s face as if it’s positioned in the direction of the most important natural subject. It’s as important to capture the natural surroundings in the best way together with a good position of the model. We mostly prefer a wide lens for these poses for photos. This way you can use the human element as a scale to the immense nature surroundings.


Photo pose 3: The balancing pose
With the balancing pose, you can create a playful element in your photo. We think this looks very natural and gives an interesting touch to your photo. This is one of our favorite outdoor photoshoot poses. The balancing pose makes even more sense if it fits with the surrounding or surface you are walking on. Like taking a step from one rock to another, or crossing a small river bed.
Model tip: Only perform this pose if you feel confident and the spot is safe enough. Make sure to spread your arms to express balancing even more while taking a big step. The step distance must be wider than a normal step. Of course, it makes sense to watch your feet during the pose. This is not only better for your own safety but it will make the pose look more natural.
Tip for the photographer: Depending on the location you can instruct the model to perform the balancing pose while standing still or while moving. When it is difficult for your model to perform the pose standing still it will look more natural to move. Shooting in medium to fast burst mode will give you more flexibility to choose the right moment in post-editing. A fast shutter speed (minimum double the focal length, same as the “jump in air” pose) will result in a crispy sharp image!


Photo pose 4: Climbing
Another great outdoor photography pose is the climbing pose. Same as the balancing pose, this pose comes out the strongest when it fits the terrain. We often do hikes where some climbing is necessary and love to capture these moments as well! Combining it with an extra element like a ladder or rope makes this pose look even more adventerous. Or when you are high in the mountains or have some hills in the background this pose will fit the environment very well.
Model tip: Try to look as active as possible. To achieve this it is better not to pose standing still but perform the climb. Good coordination is necessary as this pose can be quite challenging. In case the surroundings allow it try to level both legs and arms on another height from each other. This will result in a better natural-looking position.
Tip for the photographer: Try to position yourself lower or higher in perspective to the model. Lower will result in a better angle to emphasize the model is climbing up and gaining height. On the other hand, positioning higher than the model will emphasize the model is reaching the summit. Especially if you can frame a lower level of mountains in the background. When the model is moving to perform the climb in the most natural way, a fast shutter speed is needed. Creative wise an open aperture can separate the background from the model even more. This way the distance of the background seems even further away what can visualize the great height.


Photo pose 5: Windy skirt or dress pose
A great dynamic pose is the windy skirt or dress pose. This is a very popular pose for photoshoots and Instagram pictures. We love to use it as an outdoor photography pose as well. The contrast of a female model in a beautiful dress surrounded by incredible nature is an impressive combination. This pose works best on a windy day or location. We often choose this pose close to the ocean or high up in the mountains. Yes, sometimes we do carry a dress with us on a hike to change outfit to on an epic viewpoint 
Tip for model: Look and feel the wind direction to position yourself against it to make your dress flutter to the side or back. Your body can have various postures but this direction is quite important to hold.
Tip for the photographer: Direct your model at the correct angle to the wind and possibly the light. It’s beautiful when you achieve the correct position together with the model to let the dress catch some light. As you want to freeze the moment a high shutter speed is necessary as well and shooting in burst mode will result in a better change to pick the right moment in post-production.


Photo pose 6: The outdoor couple pose
You might assume the above poses for pictures are only for single models. This will be indeed the most common, but as a couple, you can combine these poses as well! Especially the “amazed by nature” pose for photos is perfect for that. As you are standing still for this photo pose you can take these photos with a tripod or drone. We love to take photos of ourselves surrounded by nature to show the scale of it.
Especially with a drone, you can make beautiful shots from epic viewpoints. The advantage of taking these photos with a drone is the flexibility you have by choosing different angles. Moving a tripod can be less efficient compared with a drone. And most of the time it’s much easier to check your frame as you have a live view on your smartphone. This pose is also possible for more people together, like a family picture.
Tip for the models: Additionally to the tips for the “amazed by nature” pose it’s important to make a connection as a couple. This you can do by standing hand in hand or against each other in a loving way. This way you can express how you both lose yourself in the admiration of the beautiful nature around you. You can also pose apart from each other but make the connection in another way. For example by standing in the same posture or reaching out hands to each other.
Tip for the photographer: Don’t put both models too present or too big in the frame since the focus should be mainly on the outdoor. Use the couple as a human element to show to scale of the natural surroundings. As you can see in our photo examples we appear very tiny in the frame, but still recognizable. If possible don’t put the couple in the shade but in the light, if the circumstances allow this. In this way, it is more obvious they are in the frame and it creates a nice contrast as well.


Photo pose 7: The freedom pose
For a lot of people travel is freedom. The feeling of being high up in the mountains or in the middle of nowhere is something you want to express through your photos. The freedom pose is probably one of the most natural pose for pictures in these kind of situations. This feeling can be expressed by holding your hands spread wide above your head. Another element is to bend your head slightly to the back while closing your eyes. Another version is to spread both arms like wings as if you are flying. This fits perfectly when you stand high on a rock or hill, even better when above the clouds.
Model tip: As we think this is one of the most natural outdoor poses you can really be in the moment for it. However, be aware of your position with the background. This goes together in coordination with the photographer. When using the low sun as a backlight during sunrise or sunset photoshoots, you can create a great silhouette of this photo pose. This is because the background is much brighter than you as a subject. Turn your body into the sun when performing the pose to express the freedom feeling even more.
Tip for the photographer: Shooting with a wide lens is perfect for a photo pose. With a wider focal length, you can capture as much landscape as possible. To shoot the freedom pose as a silhouette it’s important to shoot against the sun from a low angle. Try to hide the sun or the source of light behind your model. Expose manually on the background and not on your model. It’s hard to not blow out the sun but if you can hide it behind your model it’s easier to manage. With a tighter focal length, this is more practical though than using a wide lens. It can be nice to play with the position of the sun with your model to add some creativity. For example, you can slightly reveal the sun to create some nice sun flares along your model.


Photo pose 8: The walking pose
This is the last of the outdoor photoshoot poses we will mention in this blog, but it is definitely not our least favorite one! As you may have noticed by now we love to inform you with photography poses that look as natural as possible. The walking pose sounds simple but walking and looking good on a photo can be challenging! It’s all about the right position of the model and for the photographer to capture the right moment.
This photo pose comes into its own on for example a beautiful hiking trail with an incredible backdrop. The best moment to capture this photo pose is when the model takes a step to show the movement as well as possible.
Model tip: If it’s too challenging to stand still in a natural walking posture it’s better to walk. Don’t walk too fast in that case as it will be hard for the photographer to capture the right moment. Find out for yourself how you look best in the photo when walking. Sometimes taking wider steps than normal makes the walking pose look better on a photo. This way you emphasize the movement while still looking natural. In case you walk past the landscape subject you can look to it to make a connection with it. Also, be aware of the position of your arms. Don’t hold them too close to your body. In case you walk in a dress you can hold the dress with one hand in a playful way.
Tip for the photographer: When capturing the walking pose on a hiking trail, road, or path, try to use this as a leading line to the background. This creates a lot of depth in your photo and makes your audience feel as if they are walking there seeing the same views. Always try to capture some space between the feet or legs to prevent one leg or feet from disappearing behind the other one.
Make sure your shoot with a fast shutter speed. Remember, the minimum shutter speed you want to use is double the focal length of the lens you are using. Also, it will make your life much easier to pick the right moment to use the burst mode of your camera. You want to capture the step at the correct moment. Sometimes it is nice when you capture a foot before it hits the ground. From our experience most of the time it looks better when both feet are on the ground. Also, position yourself or your model at the right angle with the background or landscape subject. When positioning your model in the best way to visualize the step, don’t forget the direction he or she is walking makes sense to the surroundings.


Indoor poses for photos
Photo pose 9: The bedroom pose
To give you some ideas for indoor photography we start with some poses for bedroom photography. We frequently shoot indoor for our business LuxuryResortVideo and figured out some good-looking picture poses and bed photoshoot ideas. A model laying or sitting on or in front of the bed makes it way more interesting to showcase the bedroom instead of just capturing the bed.
The balance in showcasing the room and model is very important and sometimes challenging to find. You don’t want to focus too much on one of them. One of our favorite on bed photoshoot ideas is reading a book. This looks engaging and active in a way to invite your audience in the feeling as if they are there. The most natural way is to lay on your belly while holding the book up a bit to make it more visible. Playfully crossing your lower legs can be an extra element to choose for in this photo pose.
Model tip: Smile a bit when reading a book or pose on a bed to show your audience the joy you feel of being there. When reading a book try not to look too serious but also smile a bit. Be aware of the book genre you chose for this when the cover is visible. Smiling while reading a thriller won’t seem too realistic ;-).
Tip for the photographer: As most bedrooms are quite dark to shoot use a fast lens with a low aperture or a camera with good ISO performance. Capture your model at eye level to make it more intimate. Make sure to not show only the model but also enough elements of the bedroom itself.

Try to get on eye level with the model for some of the bedroom poses for photos

The balance in showcasing the room and model is very important for bedroom poses for photos
Photo pose 10: The bathroom pose
You can make photos of bathrooms way more interesting by adding a human element to them. With the different bathroom furniture, you can produce some creative photo poses, like a mirror or bathtub. The bathtub is one of our favorite pieces of furniture to use, especially when it stands out in terms of design. Of course, you can sit or lay in the bathtub traditionally but adding some creativity to this makes it look way better. For example, you can lay on your back, hiding your upper body in the bathtub with your legs up in the air. Or you can sit on your knees while leaning your head on the edge, supported by your arm in a relaxing way.
Model tips: Most clients or online platforms don’t allow nudity, so be aware of covering your body parts naturally. You can use your hands, foam, towels, or the bathtub itself for this. The bathtub can feel uncomfortable when it’s empty. Putting some towels on the bottom will feel more comfortable so you can perform more poses for a longer period.
Tip for the photographer: As important it is for the model to not show any nudity it is for the photographer as important not to capture it. Choosing the right angle in communication with the model is important to achieve this. Also for the bathroom, it’s recommended to use a fast lens with a low aperture or a camera with good ISO performance. Sometimes a polarizer filter is needed as a lot of furniture can reflect in bathrooms.

Bathroom poses for photos can be challenging

Bathroom poses for photos can also be relaxing
These are our top 10 best poses for photos we wanted to share with you! We hope you like them and got inspired with new photoshoot ideas. You will improve in posing for photos by practicing and you will feel more comfortable when experience grows. At least that is our experience with our photography. There are many poses for photos out there but the ones we mentioned are definitely our favorites for our outdoor photography and indoor photography.
Do you need more photography tips? We have many other blogs with useful tips for photography.
CALCULATE FOCAL LENGTH l Focal Length Calculator
HOW TO USE A GOPRO DOME PORT? – Best GoPro Dome Ports 2021
HOW TO MAKE A LONG EXPOSURE PHOTO


Hi Atiba, thanks for sharing your knowledge. We always like your beautiful pictures and films. Very professional and with a magical beauty !
Hi Marjoleine, thanks so much for your kind words. And happy to hear you enjoyed reading my blog!