
10 WATERFALL PHOTOGRAPHY TIPS – The Ultimate Guide
Photographing waterfalls can be both fun and challenging. While traveling and hiking there is a high chance of seeing waterfalls which are always very nice to capture. It’s the different elements in waterfalls such as the motion of the water and nature surroundings that makes it so interesting to photograph waterfalls. But it can be quite hard and challenging sometimes to find the right settings for waterfall photography. And also the weather circumstances influence the outcome of your waterfall photography enormously. We have been photographing waterfalls in many different countries while traveling the world full-time and experienced several challenging moments. So in this complete guide I will share our best waterfall photography tips to help you improve shooting waterfalls!
10 TIPS TO IMPROVE YOUR WATERFALL PHOTOGRAPHY
Shoot waterfalls on cloudy days
To get the most our of your waterfall photography, some of the best tips I can give you is to try and shoot waterfalls on cloudy days. The reason for this is that you then won’t have to take into account where the sun light is coming from which can easily blown out the whites of the waterfall. If the sun does shine directly on the waterfall, it will be very hard to get the details back of that part of water. Direct sunlight on the waterfall means blown out whites. And the sun can also create uneven parts of light in the overall scene which makes it very hard to edit and create a nice scene.


A perfect example of bad circumstances for waterfall photography in the first picture. Sunlight on the waterfall that causes the water to blow out. On the second picture you can see there is no sunlight so the balance of the overall light in that picture is better.
If there’s no other day that you can shoot that specific waterfall and a sunny day is predicted, then try to go as early as possible. This gives you the option to photograph the waterfall when the sun is still low. If that’s also not an option, then you can try and use a Neutral Density Filter. However this will not equalise the light on the waterfall. So you will always keep a more light up part where the sun hits the water and darker parts.

Bring a tripod for waterfall photography
When you go out to shoot waterfalls, or for landscape photography in general, then bringing a tripod is one of the best tips. This not only gives you the option to use slower shutter speeds for that silky water effect, but with a tripod you can also try your hand on focus stacking. This will give you the option to have everything in your frame in focus for those crispy sharp pictures! Besides that, it also gives you the option to create interesting compositions. For example, if you need to stand in the river stream, you can safely put your camera on the tripod while trying out several angles.

Use a Polarizer for waterfall photography
Another important tip for waterfall photography is to use a Circular Polariser Filter (CPL). Water means there will be reflections, but with a polariser you can easily reduce the glare from reflected surfaces. Besides that, a polariser also creates deeper, darker tones which gives a magical touch to greens. Sunlight can also reflect on leaves, which sometimes even results in no information in certain parts of the greens. This is a headache to edit, but a CPL filter will help you out!

Make an interesting composition
Now that you know some of the most important basics for waterfall photography, it is time to diver deeper into the technique to create interesting images of waterfalls. This is where the basic techniques of photography come in such as framing and composition. If you’re not putting any effort into creating an interesting setup of your shot, it won’t be an interesting photograph to look at. Standing right in front of a waterfall and clicking the shutter button isn’t often the best way to go. The best tip I can give here is when you arrive at the waterfall scene, take your time and walk around. Find interesting lines and angles to capture the waterfall at its best.

If there is a stream of water you can perfectly use that as a leading line in your shot. Or leaves that create natural framing can also work great. A rock in the water where you can put a person on to show the perspective of the waterfall is another great tool to show the height of a waterfall and create an interesting composition.


Look for leading lines
As said in the paragraph above, using the river stream as a leading line is a great way to make an interesting composition. It makes the eye of the viewer lead to the subject in your photo, the waterfall. It also connects the natural surroundings in a great way to the waterfall and kind of tells the story of how the water continues its journey after tumbling down.
Other kind of leading lines can be trees or rocks that lead towards the waterfall. It depends with which attributes you can work on that specific waterfall location.

Use depth of field
Some of the most general known landscape photography tips is to have everything in focus in your shot. With waterfall photography there is no difference, as you want to show the whole scene. You can eventually frame your shot behind a leaf or tree to create some depth of field. But you will have to use an aperture of at least F8 and higher to have most of the scene in focus. It wouldn’t make sense to use an aperture of F2.8 unless the scenery you’re working with is very dark. But in that case I would advice to better use a slower shutter speed than a low aperture, as this affects the sharpness of your photo enormously.
Especially with wide angle lenses you can easily have the waterfall out of focus when it is further away in your shot.


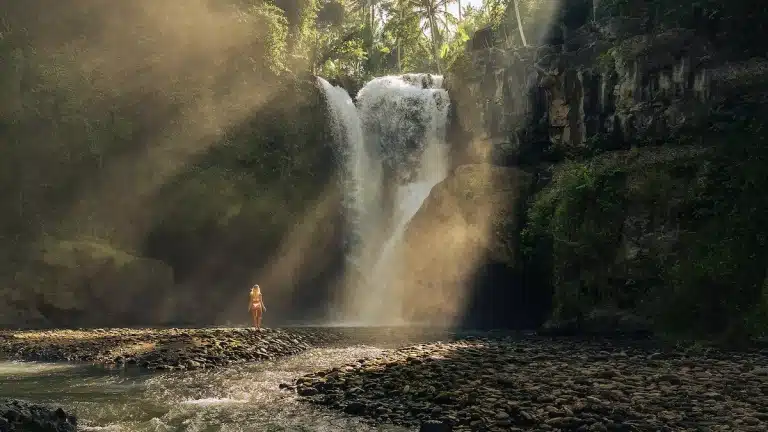
Look for light rays
In contrast to what I said earlier about shooting waterfalls on cloudy days, there is one exception when mother nature can give a truly magical touch to waterfall photography on a bright sunny day. This is when sunlight hits the water droplets that float in the air at powerful waterfalls. This can create magical light rays and adds a truly magical touch to waterfall photography.
It would be the best when sunlight comes from behind the waterfall and shines onto the spray while not blowing out the whites of the waterfall. On the pictures below you can see we got super lucky this morning at Tegenungan waterfall in Bali with some magical light rays created by the spray of the waterfall and sunlight.


Make a long exposure photo
Another great way to make your waterfall photographs look magical is when using a slow shutter speed, also known as long exposure photo. This gives a silky touch to the water and creates fairytale like scenes. Important with long exposure photography is to use a Neutral Density filter. This is because your sensor will be open for a few seconds to create that silky effect. So an ND filter will help to keep the image darker. Even when you use a small aperture such as F16 or F22. It totally depends on the long exposure waterfall settings of your camera. How slow you put the shutter speed and of course don’t forget to put the ISO as low as possible.
Read in our complete guide how to make a long exposure photo

Which shutter speed you have to use totally depends on on the type of waterfall you are trying to capture. I experienced that with powerful, big waterfalls it often is not the best option to use a very long shutterspeed. This is because there will be lots of white patches in the waterfall without information in it. Also with powerful waterfalls, it is often better to emphases its power and freeze the powerful water with a faster shutter speed.

But if you are at a waterfall that is seeping down the rocks in several streams, you can perfectly freeze those streams of water with a longer shutter speed. This creates that magical touch you’re most likely looking for with long exposure photography.

Use a tele lens for details
If you have several focal lengths you can work with, then you can create different perspectives of the same waterfall. This allows you to create completely different shots, angles and outcomes of the same location! A tele lens is known to create lens compression. This means it makes the background look much closer to the foreground.
If you have a person that can stand or sit close to the waterfall, you can create completely different scenes with two different focal lengths. In the pictures below you can see the same waterfall shot with two different focal lengths creating a completely different outcome.


But, that’s not the only reason you should also try photographing waterfalls with a tele lens. Because it also gives you the option to zoom in on the waterfall and create minimalistic scenes of the water falling down. This works in particular with waterfalls that flow down rocks. In that case you can zoom in to an interesting part of the waterfall where the water takes on interesting shapes.

Learn focus stacking to create super sharp waterfall photographs
A great tool to have everything in your shot in focus is using focus stacking. This basically means that you take multiple shots from the exact same position while using a tripod and change your focus point for each photo.
Then in post processing you merge all those photos together in Adobe Photoshop. There is a specific tool for this and the end result is a fantastic professional looking waterfall image with every aspect in focus.
This is in particular a great option when you want rocks or another interesting foreground in focus.

BONUS: drone waterfall photography tips
If you have a drone, you also might like to capture waterfalls with your drone. This is another type of photography than with a camera on the ground. But you can make some very interesting scenes with drone photography!
Important with drone photography is also to use ND – CPL filters. We use the filters of Polar Pro which are great! When you capture waterfalls with your drone the same tips apply as mentioned before. You should try different angles and degrees with the drone to capture an interesting angle of the waterfall and emphasise its height. With a drone you can also use the nature surroundings to capture the scene such as a water stream.
Other tips are to not use a too slow shutter speed, best is a shutter speed higher than 1/100. And to use the sharpest aperture to get the best quality, mostly this is F4 with drones.

Summary what you need for waterfall photography
So after all these hands on tips for waterfall photography, let’s summarise the most important things you need before you head to shoot waterfalls. Without these things you make it yourself very hard to capture waterfalls in the best way.
For waterfall photography you have to bring at least:
- Neutral Density Filters
- Circular Polariser Filter (CPL)
- Tripod
- Several lenses, from wide angle lens to tele lens
- Lens cloth to make your lens dry from the spray

More photography tips
I hope you enjoyed this complete guide with waterfall photography tips.
If you have any questions, don’t hesitate to ask them!
For more photography tips, head over to our other blog posts:
Compare focal length – When to use which focal length
How to make a long exposure photo


This post may contain affiliate links
We hope this guide will help you plan your travels! If you consider booking your accommodation, tours or rental car via our affiliate links, you support this blog because we earn a small commission at no additional cost to you!