Fog Photography Tips – 10 Ways to Improve Your Skills
Fog photography is one of the ways to make your pictures look magical. As if they came straight out of a fairytale. Sometimes fog photos can even look like a painting with the right light. Depending on the amount of fog and whether there’s sunlight or not, the scenes created with fog photography can be completely different. From ghostly, moody atmospheres to heavenly circumstances when light rays appear through the fog created by sunlight. All these different conditions need different settings, focal lengths, and compositions. Therefore we share with you the best 10 tips for fog photography.

Understanding how fog and mist work
Fog and mist are two different phenomena. Both are created by water droplets, however, they differ in their overall locations and density. So before diving into the tips for fog photography, let’s first define what the differences between fog and mist are. According to the official meteorological glossary, you can define the difference as follows:
“Fog and mist differ by how far you can see through them. Fog is when you can see less than 1,000 meters away. Mist is when you can see further than 1,000 meters away”.
Another term that is also sometimes used is haze. However, haze is a different phenomenon than fog and mist. To understand the difference, let’s dive a bit deeper into the meteorological glossary about the difference between fog, mist and haze.
Facts about fog
Fog is a cloud that touches the ground, wherever that ground is. That could be a hill or mountain peak. It shows up when water condenses and during the process of condensation, molecules of water vapor combine to make tiny liquid water droplets that hang in the air. This will form a cloud that drifts closer to the ground when humidity rises or when wind speeds drop or acutely change direction. Fog is much denser than mist and therefore it has a greater effect on visibility. There are different types of fog such as valley fog, upslope fog, coastal fog, and radiation fog.

Facts about mist
Mist is, in contrast to fog, small floating droplets in the air. Basically, it is an example of diffusion of water droplets. Mist is commonly seen when warm, moist air meets sudden cooler air. For example when you exhale in cold winter air, or when throwing water onto the hot stove of a sauna. Mist is less dense and quicker to dissipate when wind, temperature, or relative humidity changes.

Facts about haze
Haze consists of dry particles which is the biggest difference between mist, fog and haze. Where mist and fog consist of small water droplets is haze a combination of fine solid particles such as smoke and dust. Basically, haze is the reflection of sunlight in air pollution which is why you can see haze usually hanging above big cities.

10 TIPS FOR FOG PHOTOGRAPHY
How to plan & prepare your fog photography shoot
You don’t have to be a meteorologist to predict when fog is expected. However, if you know a location pretty well, it becomes easier to have a good idea of which weather circumstances give the highest chance of fog.
But if you’re traveling through a country and you only have a certain amount of days to shoot, it is important to do your research in advance. You can get in contact with local photographers or find photographers who have been to the country before and ask when fog is most likely expected.
How to predict fog and mist
It is generally known that fog is more common in autumn and winter in countries that have 4 seasons. However, this doesn’t count for tropical countries where fog and mist can appear as well. So a better measurement to predict fog is when the temperature drops to the dew point temperatures and the relative humidity approaches 100%. This means that the ground temperature has to be cool at night, with clear skies and little wind. Also if rain occurred the preceding day with the same ingredients as just mentioned, fog is extremely likely to arise. Higher areas in valleys or lakes are also more likely to have fog in the morning depending on the ground temperature. Make sure to have a weather app that shares these details to check the humidity levels and dew point.

What to bring for fog photography
Photographing fog can be a huge challenge. Due to the high humidity, your camera can get damp. But also the density of fog can change quickly, making scenes look very different in just a short amount of time. Therefore it is important to be well prepared and bring several items, listed down below.
- Bring several focal lengths to create different atmospheres in your fog photos. At least a telephoto lens and wide angle lens.
- Pack a lens cloth in case of condensation
- Put a plastic bag over your camera to keep your gear dry if the fog is very wet
- Bring a tripod so you can practice long-exposure fog photography

Choose the right lens for fog photography
Choosing the right focal length for foggy weather photography has a huge impact on how your fog photo turns out. It all depends on the conditions and density of the fog.
A wide-angle lens will make fog look less dense and show way more of the scene. This would be a great choice if you have an interesting foggy landscape you want to capture. Foggy landscape photography and foggy forest photography can both be captured with a wide-angle and telephoto lens, but the images can turn out completely different. Below you can see the difference of a photo I took on the same location but with different focal lengths. The first photo is shot on 35mm and you can see the whole landscape. In the second photo, I zoomed in on 105 mm to make a minimalistic shot of the trees on the hill. A completely different outcome of pictures shot on the same location just a minute apart from each other.


A telephoto lens is known to compress an image, making it look like subjects are closer to the lens. This means that in foggy conditions a telephoto lens compresses the fog making it look denser. Therefore using a telephoto lens is advised with little fog so you can emphasize the atmosphere. It works even better when there is a subject in the fog, like a tree or human, where you can focus on, as you can see in my picture above.
Shoot on Manual focus for fog photography
Assuming you already shoot RAW, let’s dive deeper into the best fog photography settings for your camera. If you don’t shoot RAW already, then this is one of the most important things to switch to for fog photography. You need the information from the RAW picture to make adjustments in post-processing. More about that later.
Because fog and mist reduce contrast, your autofocus might have trouble finding the right focus point. Therefore it is important to switch to manual focus when taking photos in the fog. But then there is another challenge because with dense fog the depth of field is considerably reduced making it pointless to try to get everything in focus. The next paragraph explains what to do.

Use a small aperture
Continuing what I’ve shared in the previous paragraph, it is not only important to shoot RAW and with manual focus. Depending on the conditions of fog and if you have a light source or not, you need to manage your aperture. There is not one set rule for the best camera settings for a foggy day. It all depends on which focal length you are shooting with, the density of fog, and the amount of light coming into the scene.
Because the depth of field is reduced with foggy conditions and mist hides things from sight, subjects will be vague. The further away a subject, the less contour and color it will have. And there’s nothing wrong with that. Because when taking photos in fog you want to create a classic, painterly look. So it is okay to turn subjects into silhouettes rather than trying to create detail where it’s not necessary to have detail.

However, you don’t want to have your scene so vague that it’s not clear what the photo I about. So opting for a small aperture is the way to go, especially when using a wide-angle lens. Even if it looks in your camera as if there’s less mist in your image, you can always adjust that in post-production with the dehaze slide.
Expose correctly
Using the right exposure to make pictures in fog depends on the weather conditions. The density of fog and having light sources or not influence the settings on your camera a lot. When shooting pictures in the fog you can create a very moody scene if there’s no light source. But if there is sunlight peeking through branches on a foggy morning in the forest, you can make use of the magical light rays which turns out to be a more vibrant image.

Use the exposure compensation and go + one stop in case there is no light. So for example on a very cloudy day. But if you are in the forest with a combination of sun rays and fog, perhaps you need to put the exposure a little bit down to ensure the highlights aren’t blown out.

Fog photography & light rays
If you have the jackpot of foggy conditions with sunlight that creates a golden glow on the water or light rays in the forest, you are going to scream with happiness. Or well, at least that’s my favorite condition for foggy morning photography!
Sun rays that peek through misty tree tops add a heavenly feel to fog photography. A combination of the natural light source of the sun, a foggy forest, and a magically dressed model can take your mist photography to the next level. With a photoshoot like this, you can create scenes out of a fairytale or movie.

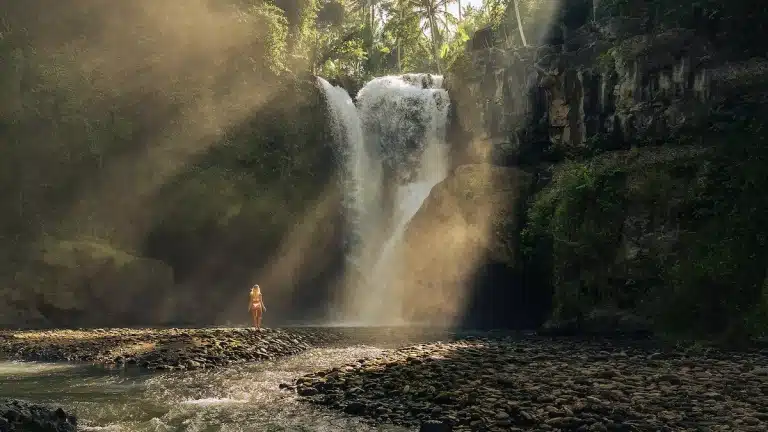
In tropical countries humid conditions also create the right circumstances for perfect sun rays. Dust and water particles make them visible. For example at waterfalls when sunlight hits the spray is caused by the power of the falling water.
Read in our complete guide 10 tips to improve waterfall photography

Or randomly on the streets when sunlight peeks through tree branches and hits dust particles. As a general rule, the closer you are to the light source the more visible those light rays will be. If you are further away, you can choose to shoot with a telephoto lens to enhance the light rays even more.

Use a slow shutter speed when photographing fog
Long-exposure fog photography is a different skill than ‘normal’ fog photography. It depends on what kind of scene you want to create. Again, it depends on the fog density, light sources, and overall fog conditions. The fog is in motion, but it depends on the wind and how fast the fog is moving. And if it’s moving upward or sideward. Logically you want fog to move sidewards for long-exposure fog photography.
With a longer exposure, you can make fog look softer. But the circumstances have to be right to apply this option. It takes time and practice to learn when you can better use a faster shutter speed for fog photography, or when it is nice to use a long exposure for fog photography. Don’t forget to bring your tripod if you want to shoot long exposures!

Include foreground in fog photography
As mentioned earlier, fog results in reduced contrast which can make images look flat with little depth of field. Therefore you need to think about an interesting composition when taking photos in the fog. The general rules of composition in photography apply. However, foggy landscape photography and foggy forest photography is another skill.
A foggy forest looks completely different than it looks on a clear day. Because forests can absorb a lot of fog, they can make a scene look less chaotic. You will maybe even find compositions in foggy circumstances that you would have never captured on a clear day.
To create a feeling of depth in your foggy images, try to include a foreground close to the camera. This not only gives a more intimate feeling of the photo but also leads you to the subject in your mist photo.


The same location but with different circumstances
Use a leading line in fog photography
Continuing on composition tips for fog photography, you can also use a leading line instead of the foreground. Framing your fog photo well can create a perfect leading line going to the subject in your photo that you want to emphasize. For example in a foggy forest where a path with trees on both sides creates depth towards the subject, a person, walking in the middle.

Tips for editing fog photos
After finishing photographing the fog, it is time to review your shots and edit them! Don’t feel discouraged if your fog photos look flat and dull at first sight. Images taken in foggy circumstances lack contrast and saturation, so it’s up to your post-processing skills to make it an (even more) interesting image.
Here is a summary of how you can edit your fog photos.
- White balance. Make your photo look cooler or warmer, depending on what kind of atmosphere you want to create.
- Dehaze. Depending on the amount and density of fog you can use the dehaze slide to create the right amount of fog.
- Calibration. With the calibration tool, you can make the colors pop in case you want to emphasize a certain color such as green or red.
- Black & white tool. With the blacks and whites you can add contrast to your image and create a certain mood. Move the sliders around to find the right balance in combination with the dehaze.
- Contrast. If you want to create more depth in your picture you can add contrast. You can either do that locally with radial filters or in the whole picture.
- Clarity. When you add a little bit clarity it can emphasize light rays. But be careful with adding too much clarity, it can make the image look noisy.

Do you want to learn more?
I hope this guide about the 10 fog photography tips is going to help you improve making photos in the fog. If you still have any questions don’t hesitate to ask in the comments section!
For more photography tips, head over to our other photography blogs.
10 tips to improve waterfall photography
How to make a long exposure photo
How to make a time lapse video
Did you find this post useful? Save THIS PIN to your Pinterest board on Pinterest to read it later again.


This post may contain affiliate links
We hope this guide will help you plan your travels! If you consider booking your accommodation, tours or rental car via our affiliate links, you support this blog because we earn a small commission at no additional cost to you!