
How to add Cinematic Black Bars to your video?
In recent years, cinematic black bars have become a popular trend in cinematic videos or short films. When watching Hollywood movies in movie theatres you’ve probably noticed the black bars at the top and bottom of the screen. The same you’ll notice with TV shows on TV Screens. These so-called black cinematic bars, also known as letterboxing or widescreen bars, serve a crucial purpose in cinematic storytelling. In this article, I’ll discuss the significance of cinematic black bars and how you can add them to your video clip with video editing software like Premiere Pro, Davinci Resolve, or Final Cut Pro.
Creating a good cinematic video the right way needs several elements. One of these is changing the original aspect ratio to a cinematic aspect ratio. As a video editor, you can achieve this by adding cinematic black bars to your video. In this article, I will not only explain how to create cinematic black bars in Premiere Pro. I will also share other creative ways to achieve the cinematic aspect ratio for a more cinematic look. Are you a Davinci Resolve user and like to know how to create cinematic black bars? No worries, the methods described in this article can be used for other editing software as well. Another important topic I will inform you about is how to shoot your video for which you want to add cinematic black bars with your video editing software.
How do you get Cinematic black bars?
These days you will find also a lot of video content on YouTube and social media with cinematic black bars. The reason for this is that video editors want to achieve a cinematic look in their videos. It does not mean every video automatically looks more cinematic when using black cinematic bars, but it adds a more cinematic feel.
There are different ways, and opinions, on how to achieve the widescreen look. Easy ways to do this are cropping your video or using letterbox templates. There are several websites offering letterbox templates. Here you can download a PNG image with a top and bottom black bar for different aspect ratios. As a video editor, you can put this PNG image on top of your video footage to achieve a widescreen look. Another way is to add an adjustment layer in Premiere Pro and use the crop effect. It will crop your 16:9 video footage which adds black areas on top and bottom of your video clip to visualize a wider look. Finally, you can also achieve the cinematic widescreen look to adjust the actual aspect ratio of your video sequence.
Now let’s go through these different steps to explain step by step how to create cinematic bars for your video.

Why do black bars feel cinematic?
Most video editors are adding cinematic black bars to their videos to achieve the 2.35.1. aspect ratio. Adding these cinematic bars is a creative way to have your video look like Hollywood movies on the big screen.
Subconsciously, people recognize that this is something that happens commonly with cinematic Hollywood movies and not as commonly with other kinds of videos. Other kinds of videos, like a prank video on YouTube, are usually just shot at 16:9. So when we watch a real movie trailer on Netflix or YouTube there are the black cinematic bars. But when watching the prank video on YouTube there are no cinematic black bars. This becomes something that our brains recognize. We see the black bars and think “That’s like a movie.”
How To Create Cinematic Videos?
When I started making videos I lost valuable time watching a huge amount of YouTube videos to understand how to create cinematic videos. I was craving for a course to teach me how to produce professional videos from A-Z. After landing on the website of Full Time Filmmaker I was so relieved to find out they offered this course with over 30.000 members!
Creating high-quality videos is no longer merely a desirable skill; it’s essential. Whether you’re an aspiring filmmaker, a business owner producing content for your company, an influencer or YouTuber, or a parent aiming to capture cinematic family moments, there’s no time to spare to start learning.
Join FULL TIME FILMMAKER for the most complete online film school!
Life Access to 700+ Videos
100+ Hours of Content
Stream all 700+ Videos
Access FUTURE Videos
FB Group Access for LIFE
Gear/Software Discounts
Downloads/Presets & More
30 Day Refund Policy
How to add black cinematic bars by using PNG images?
To be honest, I do not recommend using PNG images for adding cinematic black bars to your video project as it’s the wrong way to do it. Adding black bar overlays by putting a black bars PNG file over your video can cause several downsides. Firstly, it will increase your video file unnecessarily. Secondly, when rendering in a low(er) bitrate the black bar will lose detail and it won’t look black anymore.
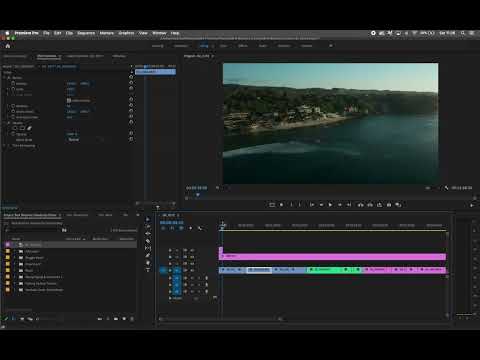
However, adding cinematic black bars in Premiere Pro is one of the easy ways to add cinematic black bars to your video. The simple steps are downloading the given PNG image for the right resolution and dragging it into your timeline on top of your video. After that reposition your shots to fit the wider aspect ratio and you’re done! You can google for “PNG images cinematic bars or cinematic black bars” to find some websites that provide them. You can find PNG files with various aspect ratios. This method works with every video editing software as well, like Davinci Resolve and Final Cut Pro.
How to add the black bars in Premiere Pro with an adjustment layer?
Another way to add cinematic black bars in Premiere Pro is with the help of an adjustment layer and the crop effect. If you never used an adjustment layer before, I recommend reading my other BLOG first which is all about how to add them in Premiere Pro. And if you want to know everything about the crop effect you have to read this COMPLETE TUTORIAL about how to use the crop effect in Premiere Pro.
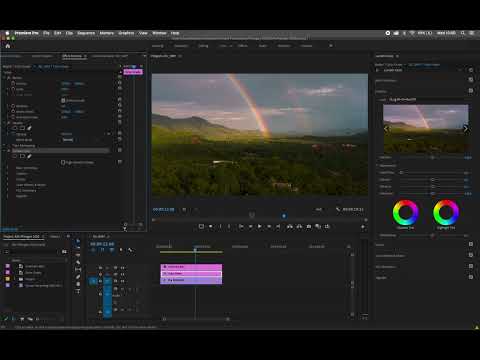
Especially in the beginning, I’ve used adjustment layers to create cinematic black bars in Premiere Pro. After starting a new project, you have to add a new adjustment layer from the drop-down menu in your project panel. Rename this adjustment layer to “cinematic bars” and place it on your timeline on top of your video footage. Then drag the crop effect from the effects panel to the adjustment layer and crop the top and bottom with 12% to achieve the desired widescreen aspect ratio of 2.35.1. The final touch is to reposition your shots to fit this new aspect ratio and you’re good to go!
How to adjust the Aspect Ratio in Premiere Pro to create black cinematic bars?
Save the best for last, which certainly applies to the way we are going to discuss now. What is better is to create a widescreen aspect ratio by adjusting the actual video aspect ratio of your video. You can adjust the aspect ratio in Premiere Pro by changing the resolution of the sequence. Please realize there are tons of resolutions for specific aspect ratios. For example, have a look HERE for a free extensive cheat sheet to find the matching resolution for the aspect ratio you desire.
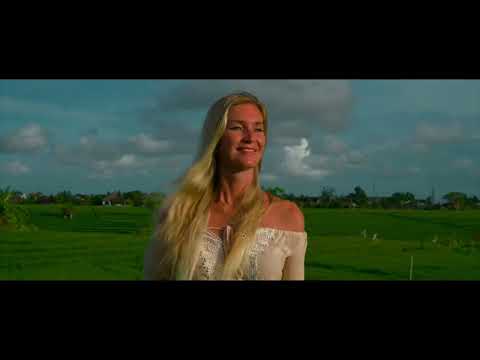
So, how to adjust the Aspect Ratio in Premiere Pro to create cinematic black bars? In my case, I want to adjust the 4K (UHD) 16:9 footage (3840*2160) to 2.39.1. According to the cheat sheet the new resolution needs to become 3840*1609. To achieve this, drag a shot of the 4K(UHD) footage into your timeline. This way, the sequence setting will match the resolution and frame rate of the shot. In my case 3840*2160/25 fps. Select from the menu Sequence > settings and change the vertical frame size to 1609. Hit ok and confirm the “warning” pop-up by clicking OK. After this, you will notice the preview panel changes to the new resolution!
Edit your video the way you want and reposition the original 16:9 shots to achieve the proper composition. After rendering your video (make sure to match the resolution in the render settings) and playing it on your device you will still see the “cinematic black bars”, but now properly created. The huge advantage of creating it this way is that your video will adjust itself to any device and platform it will be played on.
How to visualize cinematic aspect ratios in your camera?
As I mentioned before, cinematic black bars are one of the elements to give your video a more cinematic feel. Many more visual effect factors affect the cinematic feel and look of a video. Factors like camera settings, light, composition, different camera angles, music, sound effects, and of course storytelling. Most cameras shoot video in a 16:9 ratio, making it harder to compose your shots correctly for the wider aspect ratio of 2.35.1. With the 16:9 aspect ratio, you will have more space (in height) to frame your shots. When adjusting the 16:9 footage to 2.35.1, it may result in poor composition, because of the crop.
The best way to avoid this is by activating “video guidelines” for cinematic aspect ratios on your camera. Not every camera has this, but most mirrorless 4K cameras do, like the Sony A7Siii I use to produce our videos. This setting will add guidelines on the camera’s LCD screen to mark the desired aspect ratio. With these guidelines, it’s way more convenient to compose your shots correctly for the wider aspect ratio. In case your camera doesn’t have this setting I advise to compose your shots with more space taking into account the crop when adjusting the aspect ratio in post-production. Or, you can simply tape the cinematic black bars on your LCD screen to help compose your shots properly.

Uploading your video on YouTube
Please take note of the following when you want to upload the video on YouTube. Because of the adjusted aspect ratio, it won’t be possible to add the YouTube end screens to your video. Simply because there is no more space compared with the standard 16:9 aspect ratio. Luckily it’s still possible to add cinematic black bars to your video and use the end screen option. Just apply the black bars with adjustment layers or a letterbox template without adjusting the aspect ratio.
Please be aware the discussed methods also can be applied in other edit software like Final Cut Pro or Davinci Resolve. Just inform yourself of the appropriate technical steps per edit software to get the same results when you add cinematic black bars in Premiere Pro.
Do you need more information about Adobe Premiere Pro? Read my other blogs with Adobe Premiere Pro tutorials!
HOW TO CROP A VIDEO IN PREMIERE PRO
Adjustment layers PREMIERE PRO l Everything you need to know
How to edit a TIME LAPSE VIDEO in ADOBE PREMIERE PRO
How to edit music to your video in Adobe Premiere Pro
Time remapping in PREMIERE PRO l How to make a SPEED RAMP
Find out HERE what the best shutter speed is for cinematic videos!


This post may contain affiliate links
We hope this guide will help you plan your travels! If you consider booking your accommodation, tours or rental car via our affiliate links, you support this blog because we earn a small commission at no additional cost to you!