
How to add Adjustment Layers in Premiere Pro?
The Premiere Pro adjustment layer is a powerful tool to use for efficient video editing. Primarily you will use a single adjustment layer in Premiere Pro to apply the same effect to multiple clips on your entire timeline. All the effects applied to a Premiere Pro adjustment layer affect all layers below it in the layer stacking order. I use a Premier Pro adjustment layer frequently to apply the same blend mode and opacity adjustment to multiple video clips, or the entire timeline. Another great way for video editors to use adjustment layers in Premiere Pro is to create a letterbox (cinematic black bars), to add motion effects, or for color grading. Premiere Pro’s adjustment layers will help you to optimize your workflow in a more efficient and organized way.
In this comprehensive blog, you will learn step-by-step everything about using an adjustment layer in Premiere Pro. You will learn where to find it, how to add an adjustment layer, and how to apply the different kinds of effects you can use them for. Another great thing about the adjustment layers in Premiere Pro is the ability they offer to combine effects on a single layer. It is also possible to use multiple adjustment layers to control more effects in an organized way. When you start using adjustment layers in Premiere Pro frequently you will understand how to achieve more control and flexibility in your edits. Premiere Pro adjustment layers are pretty similar to the ones of Final Cut Pro, Davinci Resolve, Adobe After Effects, and Adobe Photoshop. However, in this article, I will only show you step-by-step the process of using them in Premiere Pro.
What is an adjustment layer in Premiere Pro?
With a Premiere Pro adjustment layer, you can add various effects or color grade effects to the video clips on your entire timeline to speed up your editing process. This transparent layer is accessible through your project panel. Treat the adjustment layer the same way as an individual clip. The same kind of steps apply to it. With this I mean it can be dragged to and on your timeline. You can cut an adjustment later, turn it off, or remove it in just a few mouse clicks.
What are the advantages of a Premiere Pro Adjustment Layer?
A great advantage of this powerful tool is all the effects applied to an adjustment layer, affect all video clips below it. This ensures consistency across a range of clips. It creates a clear overview of the effects you applied, especially if you name the different adjustment layers according to the name of the effect you applied. For me, this is the most important way to use adjustment layers in Premiere Pro. Without the use of adjustment layers, you can only apply an effect on an individual clip or nested clip. And, when using many clips for your project it’s only a matter of time before you completely lose the overview of what effects you used per clip.
As mentioned before, the use of an adjustment later will speed up your editing workflow. The main reason for this is the possibility of applying various effects once to the adjustment layer, instead of to every individual clip. When using different audio effects, visual effects or luma curve effects I recommend using a separate adjustment layer for every effect.
How To Create Professional Videos?
When I started making videos I lost valuable time watching a huge amount of YouTube videos to understand how to create professional videos. I was craving for a course to teach me how to produce high-quality videos from A-Z. After landing on the website of Full Time Filmmaker I was so relieved to find out they offered this course with over 30.000 members!
Creating high-quality videos is no longer merely a desirable skill; it’s essential. Whether you’re an aspiring filmmaker, a business owner producing content for your company, an influencer or YouTuber, or a parent aiming to capture cinematic family moments, there’s no time to spare to start learning.
Join FULL TIME FILMMAKER for the most complete online film school!
Life Access to 700+ Videos
100+ Hours of Content
Stream all 700+ Videos
Access FUTURE Videos
FB Group Access for LIFE
Gear/Software Discounts
Downloads/Presets & More
30 Day Refund Policy
How to add adjustment layers in Premiere Pro?
Before adding effects to it, you need to create the adjustment layer. There is no limit to the number of adjustment layers you can use for your project.
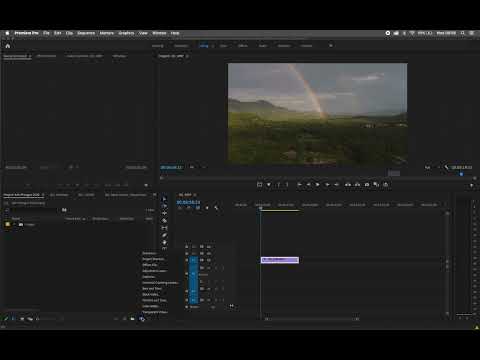
- Select File > New > Adjustment Layer or click “New Item” in your project panel > Adjustment Layer.
- Confirm the settings which will automatically be set to the same as your sequence of the entire project, so click OK.
- The next step is to rename the new adjustment layer in your project panel. Double click on it or right click to rename it. I always choose the name of the effect I want to apply, like “transform effect ” or “color adjustment”.
How to add an adjustment layer to your sequence?
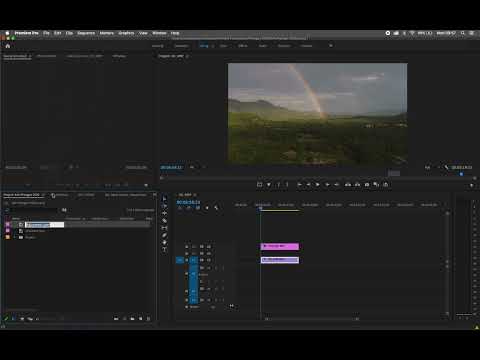
- Select the adjustment layer in your project panel.
- Drag and drop it into a video track of your timeline, making sure it’s placed above any video clip you wish to add effects to. Add extra video tracks when needed.
- Bring your cursor to the end of the Adjustment Layer and drag it to the end of the video clip(s) to cover the whole area where you want to apply the effects.
How to add a Lumetri color effect to an adjustment layer in Premiere Pro?
For this step, I will cover how to add a Lumetri color effect to the adjustment layer and how to add different video effects to it.
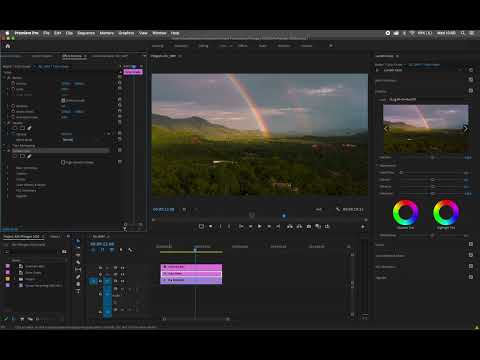
- Highlight the adjustment layer in your sequence by selecting it.
- Open your Lumetri color panel in Adobe Premiere Pro
- Make the desired color adjustments. Or apply a LUT if you have them.
How to add video effects to an adjustment layer in Premiere Pro?
I mentioned before that I often use an adjustment layer for creating a letterbox (cinematic black bars). With these cinematic black bars, you can adjust your aspect ratio to get a widescreen known from cinemas. The following steps s apply to each video effect you want to add to an adjustment later in Premiere Pro.
- Select the adjustment layer in your sequence to highlight it.
- Navigate to the “Effects” in your Project panel and search for your chosen effect. In my case, I chose “crop”.
- Select and drag the effect to the adjustment layer in your sequence.
- Navigate to the “effects controls” in your effect control panel to change the settings of the effect you applied. In my case, I adjust the values of the crop top and bottom percentages to create the desired aspect ratio of my clip.

How to save an adjustment layer in Premiere Pro?
There can be several reasons why you want to save an adjustment layer. For example, in my case, I can use the created letterbox for other projects. Adobe Premiere Pro offers the possibility to save your adjustment layer effects as a preset. This present will appear in your effect panel where you can find them for a new project.
- Select the adjustment layer in the sequence where you want to save the effects.
- Navigate to the effects control panel and select all the effects you want to include in your preset. Hold command (Apple) or control (windows) to select more than one effect.
- Right-click and select “save preset”.
- Name your preset and click save.
- You will find the saved preset in your effects panel (project panel). From there you can drag and drop the preset to any other clip or adjustment layer.
Use adjustment layers for the right scenarios
There are some scenarios where the use of an adjustment layer will not be the most efficient way. For example, in the case you want to use adjustment layers in Premiere Pro for color grading to apply the same color effect for all video clips. This is only efficient when the entire scene consists of shots taken at the same location in the same lighting and similar exposure. You can determine the exposure level with the help of the luma curve effects in the color panel. If these two factors vary too much, each clip requires slightly different settings and an adjustment layer is not as helpful compared to when the footage is quite the same in terms of lighting.
How to use adjustment layers in Premiere Pro to optimize your editing workflow?
As mentioned before, using adjustment layers in Premiere Pro frequently will help you understand how to achieve more control and flexibility when editing. This results in an optimized workflow to edit in a more organized way. Below, I will sum up important tips you have to apply to optimize your edit workflow, with the help of Premiere Pro adjustment layers.
Use different adjustment layers for different effects.
In Adobe Premiere Pro you can stack as many adjustment layers as you need. Just add another video track and drag the new adjustment layer on it. You can apply several effects on one adjustment layer but with the use of separate layers, you keep it more organized. Also, it is more flexible to modify the applied effects per adjustment layer in terms of opacity adjustments.
Label the different adjustment layers with different colors.
You can label an adjustment layer to select it in the timeline with a right mouse click. Then select “label” and the desired color. This will make it more visible and easy to separate the adjustment layer’s different effects. Through time you will probably always use the same color for the same effect so you will recognize the different adjustment layers even quicker.
Color correct per individual clip and use the adjustment layer only for color grading.
In case you add a Lumetri color effect to an adjustment layer I advise using this only for the color grade or LUT. In practice, every clip needs a different color correction because the white balance and exposure settings are mostly not the same for different shots. But in case you want to achieve a similar “look” with all your clips you can apply a color grade or LUT on an adjustment layer. This is an efficient way to achieve the same style and look with all your video clips.
Use keyframes for the applied effects per adjustment layer.
The great thing about using different adjustment layers for different effects is the ability to keyframe every effect creatively. For example, in case you want to fade in and out the opacity of the applied effect, you can do this by adding keyframes in the effect controls window. Make sure to label keyframed adjustment layers to recognize them in your project browser.
Organize the different adjustment layers in your project window.
Just like you organize your video clips per subject or location in different bins, you can do this for the different adjustment layers. In your project panel add a new bin and name it “Adjustment layers”. Create a new adjustment layer in this bin or drag already existing adjustment layers in this bin. This way you keep it way more organized and you prevent the adjustment layers from being created in the footage bins.
Do you want to learn more?
I hope you learned a lot about the Premiere Pro Adjustment layer. If you still have any questions don’t hesitate to ask me in the comment section!
Do you need more information about Adobe Premiere Pro or editing in general? Read my other blogs with Adobe Premiere Pro tutorials!
Learn how to add CINEMATIC BARS in PREMIERE PRO
HOW TO CROP A VIDEO IN PREMIERE PRO
Read here how to edit a TIME LAPSE VIDEO in ADOBE PREMIERE PRO
How to edit music to your video in Adobe Premiere Pro
Time remapping in PREMIERE PRO l How to make a SPEED RAMP
Editing in Davinci Resolve? Learn everything about The BEST DaVinci Resolve SHORTCUTS
Find out HERE what the best shutter speed is for cinematic videos!


Great run down, but the question is…… it better to have 2-3 adj layers if you are adding LUTS & Plugin ins & lumetri tweaks or stack it all on one? Not sure if Im imaging things but usually when n I don’t use two the render & operation in PP is slower & lags more ????
Hi Andrew, thanks for your comment and great question! I’m using different layers per effect to keep it organised. This way you can divide the layers more easy if you don’t want them to put over every shot. Not sure about the difference in render time but if this is your experience it makes sense for sure.